Introduction
In this article you can hopefully learn about the instructions within behaviors, how they are used and hopefully you can come away with some usage context. The behavior walkthroughs listed are not designed to be feature rich and will undoubtedly be improvable, but should hold up for the task it is designed for.
To prepare for the first scenario, you may need to know a few specifics:
Basics
To be able to apply behaviors to a unit (Bot or Building) you must equip ![]() Behavior Controller to the unit. After the program is put together you can start execution of the program from two places.
Behavior Controller to the unit. After the program is put together you can start execution of the program from two places.
1. Inside the programming interface by pressing the "Play" button.

2. With the unit selected, to the right of the unit's inventory slots, there is now a small "behavior controller" area. Here you can start, stop or edit the program.

For a detailed explanation of the interface, see this guide.
Utilizing registers for passing information into and out of a behavior
Registers, parameters and variables are a key element to the game and especially so for making any good use of behaviors. In short, all three are essentially one and the same: a place to store and recall information.
- A register is the inputs and outputs of components and a few other interactions such as setting a location for your bot to store in. When you assign a
 Fabricator to produce
  Metal Bars, you are interacting with the first register. The
  Fabricator then assigns the second register to
  Metal Ore.
- Another example is the visual register on the unit registers interface below the component registers.
- A parameter is created from within a behavior - on the top left of the editor, you will see a - and a + sign. You can create as many or as few as you deem necessary. The main benefit of doing so is so that you can pass information into and out of a behavior.
- A variable is exclusively for use inside a behavior and it serves as a quicker way of creating information storage that is visually recognizable at a glance. If you have any instruction with an output, you can create a new variable - they are alphanumeric, so the first is A, then B, etc.
Components and their instruction counterparts
One objective of the game is to enable the user to play the game as they desire. It isn't strictly necessary to utilize behaviors to enjoy or progress through the game, but you're here now so you've made your choice.
Some instructions have a relationship with existing components. One of these is the ![]() Portable Radar and another is the
Portable Radar and another is the ![]() Signal Reader and the two are often used in combination. However, you do not need a Signal Reader to read and use signals inside the behavior.
Signal Reader and the two are often used in combination. However, you do not need a Signal Reader to read and use signals inside the behavior.
- You can find a
 Construction using a
  Portable Radar with the filter:construction. The Radar instruction must be accompanied with its counterpart component but it functions in a similar way. The result can be linked into a
  Signal Reader or Read Signal instruction to automate getting the signal.
 - A building under construction has a requirement of materials to be delivered. What is useful in this case is that it stores required materials the signal register. Using a
 Signal Reader or the Read Signal instruction, you can obtain the stored signal value.
 - The Mine instruction is reliant on having a
 Miner or better equipped.
 - Set Sign Post requires you to have a
 Sign Post.
Example 1 : Quick Foundations using a basic loop (by Kitaru)
This will help you assign a unit to place foundations down. Usually units will move 1 ![]() Foundation Plate at a time, going back and forth between the building and the construction site, wasting a lot of time. This simple loop lets a unit pick up as many plates as they can and then continue to do it's own thing like delivering those plates to the construction sites.
Foundation Plate at a time, going back and forth between the building and the construction site, wasting a lot of time. This simple loop lets a unit pick up as many plates as they can and then continue to do it's own thing like delivering those plates to the construction sites.
- Have a
 Fabricator building
  Foundation Plate.
 - Grab a unit and put a
 Behavior Controller on it.
 - Create a new behavior on the unit or in the library.
- Add a Parameter to the new behaviour. You can change the name of the Parameter for easier reference.
5. Add Pick Up Items and set the Source as Parameter 1(P1).
6.Add Have Item next. Set the Item to ![]() Foundation Plate and then loop it by dragging the point on the right to the point on the left like shown below. This loop will freeze instuctions, leaving the unit to do its own thing while it has
Foundation Plate and then loop it by dragging the point on the right to the point on the left like shown below. This loop will freeze instuctions, leaving the unit to do its own thing while it has ![]() Foundation Plate. Once it runs out of
Foundation Plate. Once it runs out of ![]() Foundation Plate, the loop will break and return to the start of the behaviour.
Foundation Plate, the loop will break and return to the start of the behaviour.
7. The behaviour is done! Name your behaviour and save it in your Library. Make sure it's loaded on the ![]() Behavior Controller on your unit.
Behavior Controller on your unit.
8. Set your Parameter by click and dragging the empty P1 box to the building making your ![]() Foundation Plate.
Foundation Plate.
9. Click the play button that appears next to your inventory.
10. You still have to manually use the Build option to place Foundation constructions. This means the unit needs to be connected to the Logistics Network to do its thing. It only needs to deliver the ![]() Foundation Plate it's holding to the constuction sites you placed so you can turn off Supply Items and Request Items.
Foundation Plate it's holding to the constuction sites you placed so you can turn off Supply Items and Request Items.
Enjoy your quicker placement of Foundations!
Example 2: Creating a Construction Worker (by Johan)
One day you may want to create a building far out in the distance and ask yourself why the bots don't bother tending to it. Simply put, its not in the logistics network and so you will have to perform manual operations or adapt.
Requirements
For this next part you will need: a ![]() Portable Radar a
Portable Radar a ![]() Worker and a
Worker and a ![]() Behavior Controller.
Behavior Controller.
The Radar
- Find and introduce the Radar instruction and connect it to the starting node
- Set a filter for
 Construction into the Radar instruction - it should be under the Information section
 - Set the Result parameter to a new variable:A
When executed - this instruction programs inputs into a radar component and then waits for a result before proceeding to the next instruction.
The Signal Reader
- Find and introduce the Read Signal instruction - attaching it to the top node of the Radar instruction - we will ignore the No Result branch of the Radar instruction
- Set the Result variable:A into the Unit parameter of Read Signal
- Set the Result into a new variable:B
What we have now is a two-instruction behavior that finds a construction in range and acquires its signal which is an item required for the construction to be completed. What we must do next once we have this information is to automate the acquisition and delivery of those items to the unit and the construction in question.
Going Home
- Find and introduce the Move Unit instruction - we will want to be able to specify where the bot needs to return to to await items
- Create a parameter within the behavior editor ( - and + up the top left corner) and click on its name and label it as "Home Location"
- Click on the Target parameter of Move Unit or drag in the first parameter:P1
Parameters can be set manually from outside the behavior - this allows you to pass in virtually any information, but for this use it is intended for use on anything that has a coordinate. This could be an open space, unit, building and maybe even an item on the ground.

 Parameters can be set manually from outside the behavior - this allows you to pass in virtually any information, but for this use it is intended for use on anything that has a coordinate. This could be an open space, unit, building and maybe even an item on the ground.
Requesting the items
- Find and introduce the Request Item instruction - we are going to ask the logistic network to deliver what the construction requires
- Set the variable:B into the Item parameter
We have requested an item from the network, but we will want to wait until it is in the Worker's inventory before we return to deliver the items. We need to know what is in our inventory and then evaluate what action to take.
Counting
- Find and introduce the Count Items instruction
- Set Item to variable:B and set Result to a new variable:C
Note that if the Unit input is blank, the instruction defaults to reading Self instead of another Unit Evaluating
- Find and introduce the Compare Number instruction
- Set Value to variable:C
- Set Compare to variable:B
- Link the If Smaller node to the start of the Request Item instruction
What this means is that if we have less than the desired amount, the bot will stay put until the items are delivered
Dropping off the items
- Find and introduce Drop Off Items to the If Equal node of the Compare Number instruction
- Set variable:A as the destination
You're done!
Name your behavior, give it a description and if you're editing from inside a ![]() Behavior Controller then make sure to save it to the Library down the bottom right.
Behavior Controller then make sure to save it to the Library down the bottom right.
Setting it up and usage
- Apply the behavior to a
 Behavior Controller on your
  Worker and also equip a
  Portable Radar
 - Because you added an additional parameter to your
 Behavior Controller, you will note that it has its own register. Set this to a location within your power grid that you deem a suitable place to wait for materials to be delivered to the
  Worker
 - Press the Start behavior button to the right of your unit's inventory slots
- Place a building somewhere off in the distance and then task your
 Worker to move somewhere near it - the radar will do the rest
Sit back and watch
Reference Code
| Double-click to select all - copy to clipboard and import the behavior to your library |
|---|
|
DSCAa2dsUUy1BX12p3iWLtA2rk4aY2bGpfN0xw7bf15mVfw2cIS6E0p6yOP0A4laj02SA031eMDa8488WrJ0eNtl24fF48f0lb4db47DlhI3A6Rpp2a06KL4Ms57X1nG4fc1oaG3u0Xsaxr01873F2iBMUd0R7x8D1u2rvA3uq8vv1ZJY8m1VJWER4F8kxu3WHLEZ1qXMVu0gj5O70mqn1i447Kvc1aQ3H12nsIdq24fpIi4gZgUt2nAC0u2WmOet3K2KLb2p5hQs1mVPBj1vLS3d43pnz63ve0k12672Up0n7uJL4X1HqE1iEUUV3KNRfG07tHlz3LeewH2TkIxp3tymr03OpiQR1jxB5z4cKNt62CRjhw0AD |
Example 3: Auto on-demand crafting of missing production ingredients (By Khorne)
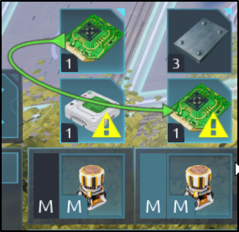
If you find yourself bothered by buildings getting locked waiting for some item that's not automated, like an internal component, this guide will show you how to set up an automatic and on-demand requested crafting of any such ingredients that's missing.

When is this not needed?
First, the easy way around is that in some cases its possible to do this without programming behaviours by just linking the "missing ingredient" window to the production window. This does however assume that you want to do the support crafting in the same building, and that the required items and outputs doesnt exceed the maximum inventory of the building.
Why use behaviours to craft missing ingredients?
There are several reasons you might want to automate crafting of missing ingredients:
- Why do auto on-demand in the first place? Say you are crafting a blueprinted bot, that wants some components like turret, capacitor etc. If you dont over-craft and stock up on those, you'd have to manually go in and craft those in another machine. This auto on-demand behaviour solves that.
- Why not use the "missing components" window? It doesnt account for items available in network. If you were to broadcast the item from the "missing components" box, it would end up trying to craft every single item the supported buiding is requesting from the network, putting uneccessary load on your haulers. Behaviour logic allows you to ensure that an item is missing from network.
- If you have some automatic or manual crafting of of smaller scale, and find it locks up because you dont stockpile every item needed.
- If you just want to be able to without worrying if the components already exist in the network, this guide is for you!
Setup
Basically you have one building where you want to craft stuff, and another building that should automatically create any missing ingredients. The support building could be used by multiple buildings, as it takes requests over radio. Likewise, you could have multiple buildings that support the main building.
- Main building (e.g. Command Centre or other buildings): Assembler, Robotics assembler, Behaviour Controller, Radio Transmitter
- Support building: Assembler, Robotics assembler, Radio Reciever
In the main buildings Behaviour Controller, create a New Behaviour and then proceed.
Parameters
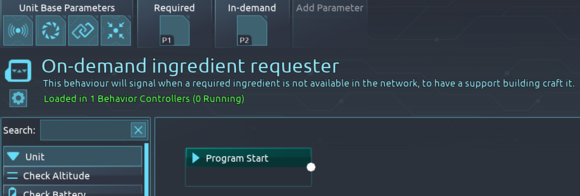
Create these two parameters:
- Required - (P1) This parameter will read the "missing item" box from the assemblers later.
- In-demand - (P2) This parameter will be the signal to transmit over radio.
Behaviour program
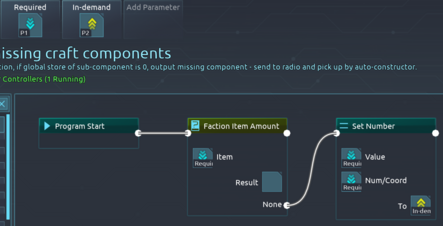
- Since we only want to create components that doesnt already exist, we start in the block "Faction Item Amount", which allows you to check the amount of an item in the network. In this block, we select the parameter Required (P1) as the "item". We can leave the results field empty. We only want to know if the item is missing and dont intend to reuse whatever value it returns.
- Add a "Set Number" box from the "None" output - we only want to request items if the required item returns none from network. Value - Parameter 1; "Required" Num/Coord - Parameter 1: "Required" To - Parameter 2: "In-demand"
Transmitting the on-demand request
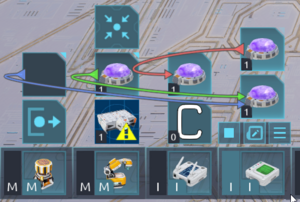
- Link (Drag & drop) the "missing item" field above the Assembler and Robotics assembler to the Behaviour Controllers "Required" parameter (P1).
- Then link the Behaviour Controllers output parameter (called "In-demand" or P2) to the "value" field that the radio transmitter will send.
- Finally, choose a Band for the radio transmitter, in this example I chose C. You can dedicate any band for this.
Setting up the support building to recieve requests
Since the signal is coming in over radio - no behaviour controller is needed. Just link (drag&drop) the incoming signal into the craft-field of the assemblers.
Note that you must use the same band (here as the letter 'C').
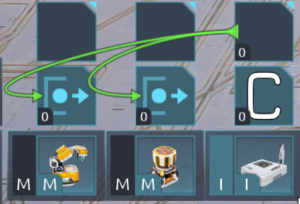
All done!
Assuming the buildings have power, are connected to the network, you have the basic resources on hand, and the above setup was completed sucessfully; the main building will now get support from the recieving building whenever you try to have it craft something that doesnt exist in the network!
Taking it one step further
- Daisy-chaining support buildings of different types could allow you to on-demand request increasingly more complex items.
- Supporting multiple buildings is just a matter of adding the behaviour controller and radio transmitter with the configuration as described in this example, using the same band on the Radio Transmitter.
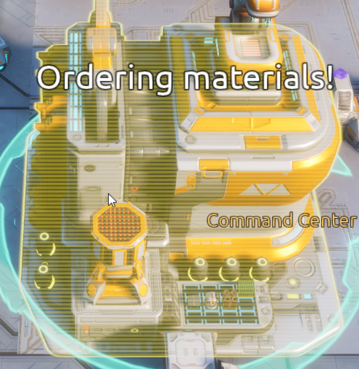
You can add a signalpost, and put "Set Signalpost" box in the behaviour program to have it display a message if it is currently ordering materials from the support building.
You need one block on each of the outputs from the "Faction Item Amount" box, where one is just to clear out the message once its no longer true.
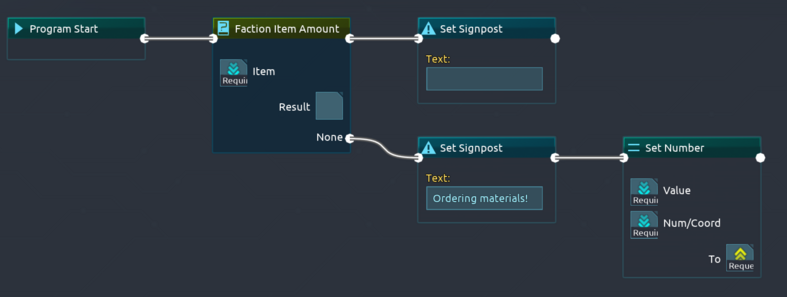
Hovering the building now informs you that it has requested components to be crafted.
Further Notes and Common Mistakes
The bot must be connected to the Logistics Network for the Request Item instruction to be fulfilled
You can use Set to Component with the behavior module as parameter to use the parameters of the behvior module as an array. You can read them like an array using Get from Component.
As every register can have a number, they are "No Match" on Data type switch. Value refers to "Information". You need to use additionally Compare Number.
Decode a behavior into JSON
Other potential walkthroughs
Taking volunteers to write short guides on putting together a few simple behaviors.
Try not to add layers of complexity - creating a guide for something that can be improved upon will allow the student to reinforce the existing knowledge you have given them.
We need roughly 5 good examples
Good subjects may be:
Obtaining and utilizing a ![]() Signal Reader or Read Signal for item delivery or mining
Signal Reader or Read Signal for item delivery or mining
Using Compare Number to determine outcomes
_


